


The GUI
The graphical user interface of bee is in fact quite simple. So let's use a complicated diagram to describe it:
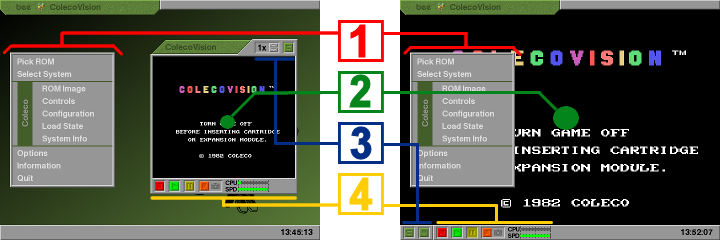
The emulated screen (2) can either be displayed in a window (left image above) or in the background on the full screen ("fullscreen" henceforth). In either case, there is a menu panel (1) on the left side of the screen. There are buttons to change the display (3) of the emulated screen. In windowed mode, the fist control element on top of the window allows you resize the emulation window, thereby changing the scale of the video output (as long as the window fits on the screen). The other button switches to fullscreen mode. In fullscreen mode, on the other hand, there are two buttons in the bottom left corner of the screen. The first of them switches to windowed mode, the other one determines whether the gui remains visible (if the button is down) or is hidden (if the button is up) while the emulation is running. Finally, there are four buttons that control the emulation (4). From left to right they are stop, run, pause, and record. Next to them, there is a meter measuring CPU usage (upper bar, less is better) and emulation speed compared to the original system (lower bar, more is better).
The Menu Panel
Pick ROM: This feature allows you to choose any known ROM you have from a list. All your ROMs will be listed, sorted by name, and some information from the ROM database will be displayed for each image. (See the next section for a detailed explanation of the symbols used in this dialog.) If you have savestates or recorded gameplays for a certain ROM, they are also listed here. When you choose an image or a savestate, bee will automatically load the appropriate system, and choose the settings that are best suited for this ROM (such as preferred input devices, correct video system, the right system ROM, etc), switch to fullscreen mode, and start the emulation. This is the easiest way of using bee. For this to work, you must first show bee where the ROM images (including system ROMS) and savestates are on your computer. To do this, browse the directories that contain the ROMs using the ROM image or load state dialog (see below) for each system. When you create savestates or gameplay recordings, they automatically become available in the Pick ROM dialog.Select System: Switch to another system...
The following options are system specific:
ROM Image: Clicking on this option opens the Load ROM dialog that allows you to insert ROM images. Some systems may allow you to insert more than one image at a time (the SMS, for example, has a cartridge connector and a card slot). Use this option
to show bee what ROM images you have and where they are on your computer, so they can be used with the Pick ROM option. When you delete ROMs or move them to another place, you can also use this to make bee aware of the change.
You should note that loading an image with this dialog does not in any way affect the system settings. You may have to choose the correct video system, system ROM, input device, memory mapper, etc. yourself to make the ROM work.
Controls: This opens a window that allows you to
- choose the input devices (e.g. joysticks, paddles trackballs)
- change the controls (i.e. assign keys, mouse movements, and joystick or gamepad events to the emulated input devices); there are separate controls for each input device on each system
- operate the input devices directly by clicking on the images
Load State: Load a savestate or gameplay for the current system. Also use this dialog to browse directories containing savestates and gameplays to make them available in the Pick ROM dialog.
System Info: Displays a short description of the currently selected system.
The following options are not system specific:
Options: This opens a general options window where you can
- change the screen resolution/window size of the emulator
- allows you to toggle between fullscreen and windowed mode (this refers to the whole GUI, not to the emulation window as discussed above)
- choose video acceleration (OpenGL is strongly recommended)
- activate linear filtering of the video output (only with OpenGL acceleration)
- choose how games with stereo 3D graphics should be emulated; bee supports 3D glasses (simple red/cyan filter cardboard glasses will do)
- change sound quality and volume
- Choose whether bee allows you to browse .zip, .gz, .bz2, .lzma, and .tar archives and access files within these archives directly. You can choose whether archives should be displayed as directories in the file browser (option "as folder") or if the contents of an archive should be treated as if they were in the folder containing the archive ("transparent").
Quit: Guess what...
Controlling the Emulation
The emulator is controlled by the stop, run, and pause buttons described above. The [Esc] button on your keyboard can also be used to toggle run/pause. This may be important to know since in fullscreen mode, the GUI disappears once the emulation has been started; to bring it back and pause the emulation just press [Esc].The Recorder
Next to the orange record button, there is a small icon that indicates whether pressing the button will take a screenshot (camera icon), record audio (speaker icon), record video (movie icon), save the current state of the emulation (snowflake icon), or record the gamplay (ball icon).Clicking on this button opens the recorder window. Here, you can change the behaviour of the orange record button, but you can also save screenshots or states and record video, audio, and gamplay directly. The files will be saved in a directory called "recorder", which is automatically created in in the same directory that contains the bee executable. (Mac users: this directory is created inside the application package; to access it in Finder, right-click on the bee icon and choose "Show Package Contents" from the context menu; look inside the "Contents/MacOS" dir.)
Images are saved in TIFF format (.tif), audio files in AIFF format (.aif), and videos are stored as QuickTime files (.mov). Savestates and gameplay is written to ESSS files (.ess); information about the file format is available on request. Please note that savestates and gameplays recorded with this version of bee may not work with future versions if details of the emulated systems change.
Some Remarks
- When the video output of the emulator is displayed in a window, the whole generated video image is shown, including parts that would not normally be visible on a TV screen. In fullscreen mode, on the other hand, the image is clipped to the visible part, and the aspect ratio is adjusted to resemble the TV output as closely as possible.
- Some consoles have a pause button. Using it won't pause the emulation, it will emulate a pressed pause button, which might for example toggle an in-game pause menu. Thus, pressing the pause button on the console usually leads to different results than just pausing the emulation with the yellow button.
- When you are choosing a ROM image or a savestate (either from the Pick ROM list or when you open a Load ROM/Load State dialog), windows are displayed next to the main dialog giving you some details on the ROM and state you have selected, based on the information stored in the database and the savestate file. These windows only appear if the screen size is at least 1024x768.
- When you first browse a directory containing a large number of ROMs, you might have to wait for a moment as bee scans all the ROMs and computes hash codes. This is only done once.
- Avoid using large solid archives (e.g. .tar.gz). Browsing these archives may be very slow, and scanning large solid archives for the first time may take very long. This is the reason why tar support is deactivated by default. Using .zip archives or compressing ROM images using gzip (one file per .gz archive) works fine, though.
- bee supports nested archives. If, e.g., a file is in an gz archive that is contained in zip file which is contained in another zip file, you can still access it. This may, however, be a bit slower. Again, avoid compressing large archives (see previous point).
- In a Load ROM dialog, only such files are displayed that can in fact be ROM images for the current system (based on the file size and contents).
- Switching on a graphic acceleration option (such as OpenGL) does not necessarily activate it; it merely means that bee tries to use it if available.
- After loading a recorded gameplay, you are in playback mode. In this mode, the green play button is pressed down, and you cannot change certain emulation settings. You can pause playback using the yellow button, or you can click on the green play button to take over control at any time. At the end of the recorded gameplay, emulation is paused and you are automatically switched to interactive mode.
- bee assumes that the netral position for each joystick axis is in the middle. If joystick inpud does not work properly, you have something like a thrust control on your joystick, try setting it to the center position.